Beer Kit Brewing – Basics
WHY NOT JUST DO WHAT THE INSTRUCTIONS TELL ME?
The instructions in the kit are very good, and should be read (repeatedly), but they miss out on a few bits and pieces that will leave you scratching your head.
Also, most parts about temperatures and gravities are a bit misleading.
VERY IMPORTANT
Make sure that everything is clean and sanitised all the way through. If you want a cheap sanitizer use 20L water + 30ml thin bleach + 30 ml cheap vinegar. This will make an excellent no-rinse sanitizer that only needs about 30 seconds contact time on clean materials.
You must be able to keep your fermenting brew fermenting at somewhere around the right temperature for the yeast
Patience is a virtue, don’t poke at your brew unless you need to.
KISS – Keep It Simple Stupid. Get a couple of brews done to get the feel of it before experimenting with ingredients like grains and hops. It’s better to make a plain but good first beer than to mess up a complicated beer.
Relax! You’ll see some weird activity in the fermenter, it’s probably fine (provided you’ve sorted the last 4 points)

- Sterilize everything. This is very important.
- Fill and boil a kettle of water (I’ll say this a lot, get into the habit).
- Assemble Fermentation Vessel (FV) and tap if you have one (ensure it is ‘off’). This FV does not have a tap, but I will add one later. If you have not yet bought your FV, I recommend that you pay the extra fiver and get one with a tap. It will make gravity readings and bottling so much simpler. But otherwise a syphon tube is also great.

- Weigh ingredients. For more about fermentable ingredients, click here.
- Warm the kit can in a saucepan of warm water. If you’re using Liquid Malt Extract (LME) warm this also. This will make it runnier and easier to pour. Make sure to take the pack of yeast out first or you’ll kill it! Removing the label will ensure that no bits of paper fall into the brew later on.

- Place the FV on the floor and add the dry fermentables (malt/sugar).
- Add 2 liters of water off the boil.
- Fill and boil a kettle of water.
- Pick up the FV and swirl, alternating direction occasionally until all the malt is disolved completely. You can stir this in, but you’re more likely to get clumps of malt, upset gravity readings, and a broken heart.

- Put your FV back on the table.
- Open kit can (upside down or the tin opener probably will not grip it) and pour the warm softened goop into the FV. If using LME, add this now too.
- Fill the can with water off the boil, stir and add the rest of the goop. The boiling water will help to dissolve the remaining goop, but be careful as the can is thin so you need a towel or oven glove to pick it up or experience all the burning fires of hell via your fingertips.
- Fill and boil the kettle again.
- Stir (or swirl) the liquid thoroughly. Take your time on this step and make sure to get everything dissolved well, otherwise you might have some undissolved fermentables sitting around in clumps, upsetting your gravity reading in a while. It will also help to aerate the wort.

- Fill with cold water to 19 or 20 liters. Some folks like to mark the FV at 2L, 20L and 23L as a handy reminder.
- Check the temperature and add hot/cold water to get it to the final volume (usually 23 liters) to about 22C. In this picture, you can see that the temperature is a bit low, so I added warmer water for the last few litres.
- Stir it vigorously to aerate the wort more. This helps the yeast to be happy litttle critters.

- Take a gravity reading and write it down. Mine was 1.040. For later gravity readings, you’ll need to de-gas them by giving them a shake, leaving them a while, or pouring from glass to glass. Then give the hydrometer a spin in case of any bubbles. But at the moment it’s just sweet hoppy water, so a quick spin is fine.

- Pitch the yeast – Sprinkle it on evenly, stir it in if it makes you feel better. For best results, rehydrate it in 10 times its weight of water (about 100ml) for about 15 minutes before mixing it in. A brief guide to kit yeast can be found here. Don’t forget to sterilize your scissors before using it to open the sachet.
- Put the lid on the FV and bring it to its resting place.
- Add the airlock afterwards, or once you pick up the FV it will suck all the airlock water in.
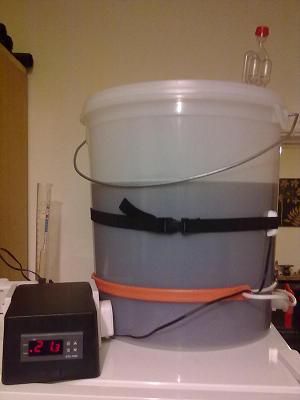
- Add your temperature control. If using aheatbelt, you can move it up the FV to produce less heat in the wort, or down to produce more. If you do not have any temperature control, make sure that you leave the FV somewhere with a CONSTANT temperature around 12-14 for lager, 18-20 for ale. More info here.
- Have a beer!
- Clean up, or face the wrath of SWMBO…

- After 24-48 hours it should start bubbling and a thick head of foam (krausen) will form. Every krausen is different, don’t worry if yours does not look the same.
- Now that your yeast has started to work, set your Fermenting Temperature.
- Over the next few days, a layer of sediment (trub) will start forming on the bottom. This is normal.
- After about a week (maybe more, maybe less) the bubbling will slow and stop. The krausen will die down, leaving a ‘krausen ring’ of gunk on the wall of the FV. Don’t mix this back in. It is bitter waste.
- Take a gravity reading, then another 2 days later.
- If they are the same, and within the expected Final Gravity range (usually somewhere between 1.008 to 1.014), then you’re good to bottle. Don’t worry if it is still cloudy, the beer will clear up fine in the bottle.

- Before bottling, prime with sugar for carbonation.
- You can either:
- Prime the bottles individually with loose sugar or carbonation drops, or bulk prime.
- Loose sugar is cheap but the beer can froth up when it hits it. It’s also hard to get uniform carbonation.
- Carb drops are like boiled sugar sweets, 3 grams each. 1 per 500 ml for less fizzy, 1.5 for quite fizzy.
- Bulk priming is racking the beer into another container containing the priming sugar (leaving the trub behind). Handy if you have varying bottle sizes.
- Cap the bottles, and put them somewhere warm (around 18C)

- Leave for a minimum of 2 weeks before drinking, at this stage it should be carbonated but once poured it won’t hold its head or carbonation very well.
- Generally the more time you leave it, the better. My favorite time is usually about 3 months.
- Shorter for some lighter beers, longer for other darker/stronger beers.
- There’ll be a little sediment at the bottom of the bottle, but you can leave it there by pouring smoothly and slowly.
Follow the thread on the forum
Author: LordEoin